How To: 2WD wheelie bar

95PGTTech

Well-Known Member
Messages
584
Location
rural NJ
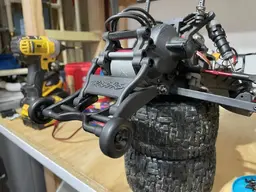
3S, Max 10 SCT, 3660 4000kv, 23/87, Proline Badlands
too much torque, too much traction, too little wheelbase
attempted to manage power with punch on ESC and radio to no avail

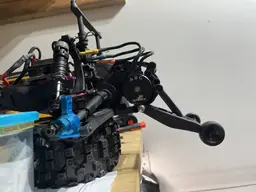
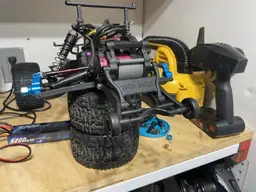
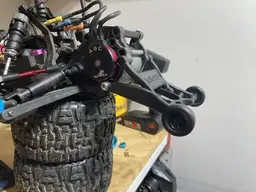
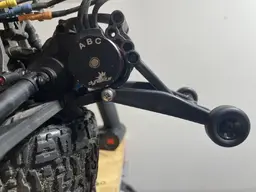
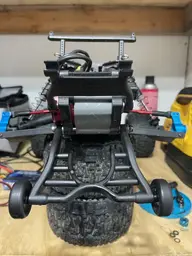
credit goes to @rambisetr for his post https://www.ecxforum.com/threads/wheelie-bar-for-ecx-ruckus.624/#post-5381 in a thread from a few years ago. Since it took some figuring out, I figured I'd take some pics.

What you need (parts wise):
Traxxas 3678
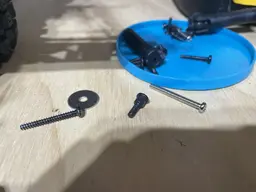
m4 x 80mm screw (qty 1)
m4 washers (qty 4)
m4 nut (qty 1)
m3 washers (qty 6)
4x7x2 bearings (qty 4)

4mm drill bit
7mm drill bit

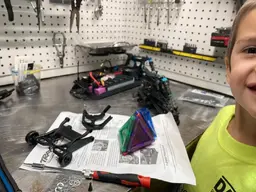
When you open the bag, part 3677 (Traxxas bar wheelie mount) will not be used. It is the piece in the second picture not attached to the wheelie bar. The supplied extra stainless steel hardware will not be used. Only two of the black M3 shoulder bolts (pictured) will be reused.
 

Attachments

  • F3133061-B87D-483D-94FF-D22D150E4EA5.jpeg
    F3133061-B87D-483D-94FF-D22D150E4EA5.jpeg
    133.6 KB · Views: 2
  • 1BFD5DBB-73F2-44CF-A125-A482044357BD.jpeg
    1BFD5DBB-73F2-44CF-A125-A482044357BD.jpeg
    177.5 KB · Views: 2
Last edited:
1. Remove Ruckus rear bumper. Although I have it removed in first pic (I was test fitting stuff), you do not need to remove the left or right rear holder brackets (black to left and right of grey motor cover). Just the bumper.
E5037BBB-7636-4D4C-A159-434AC909F718.jpeg

2. attach upper wheelie bar section as shown using two Traxxas shoulder bolts. Between wheelie bar and Ruckus holder brackets, use qty 3 of the M3 washers per side

9274BF37-234B-43E2-A966-2A12AF674600.jpeg


3. Drill out Ruckus holder bracket existing lower holes with 4mm drill bit as shown
7CDAD0DD-15FC-49A8-8757-D5B32716FCC8.jpeg

4. Drill Traxxas wheelie bar lower section holes out with 7mm drill bit TO A DEPTH OF 4mm NOT FULLY THROUGH using dial indicator depth gauge. Install two of the 4x7x2mm bearings per side
B281006E-0187-4118-8FE1-1CC3A124D83C.jpeg

5. Install lower wheelie bar section with m4 bolt placing one m4 washer under the head of the bolt, between the wheelie bar and the holder bracket on each side, and finish with washer and nut. Loctite, or nylon locknut.
54593EF8-1F9E-4933-8ADA-2FFC3E14C377.jpeg
 
Last edited:
6. Profit. You now have a 3 position adjustable wheelie bar.

Yes, the lower mount is probably a little over-engineered. I went through a bunch of different configurations until I came up with this one. I was trying to finish with something non ghetto-rigged that would hold up to the abuse my 3 year old will put it through. The issue was that the holes that are in the Ruckus to begin with are M4 sized unlike the upper ones which are M3 sized so the Traxxas shoulder bolts could just thread right into them. I couldn't easily find a M4 shoulder bolt so I came up with this through-bolt setup. The bearings are just a way to get the 6.75mm ID area that the Traxxas shoulder rides in down to 4mm so it's tight on the bolt not just slopping around.

Hope this helps the next guy.
 

Attachments

  • 7E47B2B5-369E-46F9-A74C-4CCA28A87646.jpeg
    7E47B2B5-369E-46F9-A74C-4CCA28A87646.jpeg
    133.8 KB · Views: 1
  • 3A1C7F39-232D-46C1-A721-DD961CF8B7EA.jpeg
    3A1C7F39-232D-46C1-A721-DD961CF8B7EA.jpeg
    178.3 KB · Views: 1
  • 10819B9D-94E4-4674-99A0-0B62488A9748.jpeg
    10819B9D-94E4-4674-99A0-0B62488A9748.jpeg
    184.3 KB · Views: 1
  • EB7387A7-28BA-48D9-8B8B-E04869EE9B39.jpeg
    EB7387A7-28BA-48D9-8B8B-E04869EE9B39.jpeg
    135.7 KB · Views: 1
  • C6D4437E-40AB-4883-B73B-9B7FECA418F1.jpeg
    C6D4437E-40AB-4883-B73B-9B7FECA418F1.jpeg
    191 KB · Views: 1
  • 5DF84520-1CE4-4706-A5AC-0C354D8E4F48.jpeg
    5DF84520-1CE4-4706-A5AC-0C354D8E4F48.jpeg
    122.5 KB · Views: 1
  • 2E6F9C97-E7BC-4736-B738-D6A0C6F0E2C5.jpeg
    2E6F9C97-E7BC-4736-B738-D6A0C6F0E2C5.jpeg
    205.4 KB · Views: 2
Disclaimer: this isn't a completely fair comparison, because it's now 2S 50C 3650 3300kV on Badlands, but it's WAY better with less power and a wheelie bar. This ESC doesn't have punch setting capability so power management is entirely radio settings and trigger finger discipline

slow mo launch 1/8 speed, view from behind 1/3 speed

full speed

I prefer the bar on the second to lowest setting, it allows the front end to get a little floaty without getting totally out of control. On the lowest setting, I felt like it was overall slower it wouldn't allow much weight to transfer to the rear to launch and it seemed to drag everywhere. On higher settings, it would wheelie harder, hit the bars hard, and upset the suspension. Just found out Traxxas 5186 is upgraded wheels for the bar, so ordered them why not.
 
48FEC825-0A7C-4D88-9E10-A0AC5CFF75EE.jpeg

I added 5186. They are a little bigger diameter which should effectively give me a lower range of settings, the tires are much wider, and now they have dual ball bearings in them instead of just riding on the plastic. The rubber compound is also a lot softer, which I'm hoping will give a slight bit of dampening when the truck does go back hard on the bars. The goal of wheelie bars is not just to anti-wheelie and keep the truck off its roof, but to resist and arrest the wheelie in a controlled manner and to set the front end back down, again, in a controlled manner, so maximum energy is spent accelerating not having to pedal to get the suspension back under control.
 
I assume that was from wrecking? Not from the wheelies eh?...... :oops: 🤣
Normal bashing.

Just for my personal reference in case I run into a similar issue, what part of them were you breaking and under what conditions?

I got sick of it always popping off so I zip tied it together. The slightest tumble and they break.

3 of them broke here.

16543516233152931616369994751770.jpg


This one also broke here.
16543516739561975653897440656124.jpg

But nothing else fits that I have seen.
 
Ouch, thanks for the intel. I’ll keep an eye out. ECX1014 has been discontinued for some time, and even if one could be found in some dusty LHS supply room bankruptcy sale, it looks even less robust in pics.

Luckily, my 3 year old is of superior genetics and never makes mistakes behind the wheel, so I have no tumbles to ever fear 🙄
 
Without bar
Maybe 75% throttle there…maybe. I cut out all the times it just flips on its roof it wheelies so hard


And with


Currently
3S 100c
10BL120 punch 3
23/87 gearing, metal trans gears
Proline Badland 2.8
Lots of shock and spring work
Everything aluminum up front, brass hexes

Still needs: bar moved, settings 1-2 useless (too low to use). Either add weight on front or relocate current weight farther forward. More pinion gear as long as these temps stay good. Aluminum hubs in the Proline wheels. The goal isn’t to be constantly riding the bars it’s to hit them softly and set the front end back down.
 
After a hard tumble today (side to side cartwheel after an uneven landing from a mild jump), ripped the Traxxas M3 shoulder bolt out of the ECX side motor mount plastic on the right side (the one I had three M3 washers in between.

DA104251-855B-48DB-9FF1-74A60E226722.jpeg

I had been needing to do something anyways as the highest wheelie bar position couldn't be clicked in to place because of angles so to use it I have to zip tie it as such. Really only that position and the next one down are usable anyway, the other two settings scrape the ground pretty much at ride height.

So I aimed to relocate the upper pivot point to give us better geometry and 4 usable settings. Drilled the ECX side motor mount upper most holes to 4mm


F382A81B-78F8-4F55-8943-FF23178F6182.jpeg


Pushed 4x7x2 bearings into each side of the upper Traxxas wheelie bar section. Didn't even drill them out they were 6.8mm ID, just pressed them in gently with pliers.

FDC5D611-0269-4D26-9E28-2B49A831E026.jpeg


M4x80 bolt, 4 washers total, hex nut, loctite

D36B7294-81C4-45B6-B0C2-660DC35F9954.jpeg


Now, it clips in like it should on an OEM vehicle, and this is a picture of the highest and lowest settings...much more useful. Each setting is about 1cm different (measured height from ground) relative to the next.

B406B0AF-0ACD-4278-B5EC-2C74CD757345.jpeg
4C658764-D0C6-4A05-BCC8-BDE6EF2F3423.jpeg


Some of you may have seen in my Ruckus 2WD thread where I had temporarily changed up the wheelie bar by replacing the stock upper motor mount to trans plastic piece for a threaded rod setup and a heim joint. That ended up bending, M3 just isn't big enough, so I'll need to change that anyway but it really didn't change the geometry of the wheelie bar or how it functioned so I didn't put it in here. If I go back to the AX10 locker trans I will have to make something again, and beefier, and I'll include it in here if I end up sticking with it long term. For now, the stock trans is in and working fine on 3S for what we use the RC for.
 
Last edited:

I wish this wheelie height was the 3/4 setting and not the 4/4 setting (the least amount you can wheelie), but it's working out a lot better and holding up well. The rubber tires are prone to get knocked off the plastic wheels especially in a cartwheel tumble, but they are well worth the trade off versus the original hard plastic ones. Overall, this wheelie bar probably saved this Ruckus for us - it was so annoying to drive without one that I was going to sell it. So much of the throttle range was useless it felt like driving a first gen viper or an old 80s turbo Porsche on a road course where I felt like I was fighting the machine the entire time and it was trying to kill me constantly not having a fun time driving.
 

Latest posts

Members online

No members online now.
Back
Top