Torment rebuild and listed upgrades......

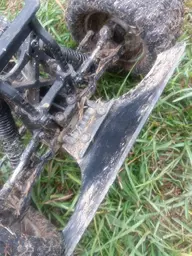
I installed an T-bone racing basher front bumper. Can I say, this is really nice. I have driven up over curbs and for the most part, driven over them without damage. Now, I don't just do it on purpose.
Only thing I have broke, and they replaced for free, is the support bracket. As long as you keep your order number from online purchase, you can get a free replacement.

Note: I think the problem is that the support is just a tad too long. I like trimmed an 1/16" off. Holes line up better too.
inCollage_20181026_072036096.jpg
IMG_20181026_071251386.jpg
I also trimmed off the extra plastic piece that sticks past the front hinge pin cover.
Now, maybe bumper is designed around leaving it, it just looks better. I like clean!
 
On my Electrix Ruckus (mostly the same as Torment) what they called a bumper back then broke and cracked the chassis holes where the bumper bolted on to. I got a T-bone bumper and left the broke bumper pieces on. With the bumper piece being broke the left piece acts as a brace and allows the bumper to flex on impact it makes it less rigid and transferring impact into the brace and chassis does not look good but been working out great (flexible yet still strong).
 

Attachments

  • IMG_20181026_102005.jpg
    IMG_20181026_102005.jpg
    200.8 KB · Views: 14
Last edited:
On my Electrix Ruckus (mostly the same as Torment) what they called a bumper back then broke and cracked the chassis holes where the bumper bolted on to. I got a T-bone bumper and left the broke bumper pieces on. With the bumper piece being broke the left piece acts as a brace and allows the bumper to flex on impact it makes it less ridged and transferring impact into the brace and chassis does not look good but been working out great (flexible yet still strong).


I remember the electrix bumper good ol days. My brother probably still remembers it from it magically pushing his leg over at 35mph.

The only two original parts from my electrix ruckus (besides screws) are the shock towers.
 
*******Shock Update*********

Sorry, forgot to list one extra part.
I used the Team Associated 12mm shock spring cup, in replacement of the Traxxas ones. More adjustment.

Part #ASC91310
 
I will be back with the rest to finish this build. I have just been busy with end of season outdoor things. Once winter sets, I will be fully dedicated to RCs. I have two more upgrade documentations. I hope to put a few on you tube too. We will see. Thanks.
 
what turnbuckles did you use for your build? not sure if you mentioned it.
looking forward to read more about your build

cheers
 
Yeah, sorry, I forgot to list them. I got busy, ha. Here they are.

These are what I installed on the front, I like them better then what I have on the rear. Plus, they are aluminum and not steel, and red or blue.

1, this pic is the combo, use on front camber and steering.
Screenshot_20181026-073707~2.png

2, this pic is the separate, use on the rear. Traxxas 3738.
Screenshot_20181026-073754~2.png

3, this is the separate, used on the front camber. Traxxas #3737
Screenshot_20181026-073905~2.png

I used the Traxxas #3643 on my rear, there steel, and pop off and always need to be adjusted.

If you wanted to go the steel turnbuckle route, you will need (2) #3643 and (1) #3644.

I will get back to the wrap of this build after this weekend. I wanted to test a couple things before listing. Enjoy!
 
Last edited:
sweet, thank you.
i just have 1 pair of steel traxxas #2445 in the front and #5539 in the back. didn't have any problems so far. but i like the blue turnbuckles. might change the front.
 
Man, how time has been flying.....summer has been really busy and build logs have piled up. I have updates soon. Thanks for being so patient.
 
Before I get it all cleaned up for the last club race of this season.
I just finished some turn buckle replacement and tire swap.

This truck takes a beating and just keeps going!!

I know I left out a few upgrade comments, I will finish here soon.
IMG_20190912_124536267.jpg

15683105689534323916348462072769.jpg
 
If anyone’s lcg torment mod doesn’t handle good at all add some weight.

My truck didn’t drive good on any surface and not even cement. Added 7 oz of lead wheel weights and it worked amazing at the local parking lot racing even with a bad setup.
 
.......... I’m actually considering to try and put a associated t4 chassis on it to control the chassis flex a little........I hear of people putting b4 chassis in amps but I’m not sure how it works but I have a b4.2 and the chassis looks almost identical to the chassis in my torment and all the t4 chassis is around 10-30 mm longer.

Well, I am to the point to looking into the next total upgrade for this winter builds.

What did you find out that worked?
 
http://www.rcsoup.com/2013/01/xtreme-lcg-chassis-for-the-ecx-torment-install/

I have an total upgraded B4.2 roller...I am tempted to do this with too! It's just sitting on the shelf.

I am also looking of getting an SC10 roller, just to use for comparison. I always wanted an 2wd associated SCT anyways.

****UPDATE; scratch that idea of B4.2 conversion.......going to do the torment conversion, just keeping it ECX parts.
I purchased an SC10, converted to SC10.2, slider! Boom.

I will finish my stock build log here. Then start the next build log this winter on my existing torment. That weird chassis of the torment is the struggle of the handling of the track. I did get it really dialed and so low to the ground. Received a lot of complements on my existing torment.

I have my 1/8th revenge build I did this summer series too. Need to give an wrap to it.

I have my Mugens I have ran this past season. I had pushed running 1/8th scales this summer. So much fun......winter indoors, oh yah, let's get it.
 
Last edited:

Latest posts

Members online

Back
Top