95PGTTech 1/10 2WD ECX Ruckus build

And where we are at right now...finally ordered the matching 4S battery so I can get rid of this 2x2s plus adapters situation, mod1 spur is on the way, and all of a sudden I had zero forward propulsion. Pulled it apart, and sure enough, the pin that holds the final drive gear on sheared clean off. I got lucky that it wasn't something more difficult/expensive and I was able to fish the pieces out relatively easily. I found the "upgrade" most guys are doing is taking high speed steel drill blanks and cutting them to length so I ordered some up. If I can't make this work I guess I have to go back to the other trans...which means making a new motor plate...ugh. There isn't a one piece output shaft option (in this gear ratio) like I have in the other one.

IMG_6677.JPEGIMG_6678.JPEG
 
Tore apart the radio on advice from someone who had a similar problem to inspect the internal antenna. No visible damage, shows continuity from board all the way to tip. Deleted the battery tray while I was in there so I can install a bigger 2S lipo. Did find a slight break in the old receiver antenna wire I had sitting on the bench, but I had already replaced that with a known working X6FG and had the same issue. I should have a third around here somewhere, but for now I have the old radio and receiver in.
IMG_6695.JPEG


Matching 4S arrived and took a balance charge fine. What other guys are saying is I should really run these two in parallel and then feed both ESC off the combined "bank" instead of feeding each ESC individually. Makes sense, not sure how I am going to execute that right now.
IMG_6709.jpeg


Started adding the wheelie bar provisions to my new motor plate setup. Lots of measuring as I went to try and keep it all square. I will probably end up tying the plate that holds the upper mount into the one that holds the shock tower mount, and I may tie upper to lower. Trying to keep as much room as possible for future slotting of the motor mount holes.
IMG_6696.JPEGIMG_6706.JPEGIMG_6707.JPEGIMG_6708.JPEG


Robinson Racing was completely out of the mod1 Revo 3.3 38T slippers and has been for some time with no replenish date, so I went with the HPI Flux 44T. I was originally intending on using the Slash backing plate and just swapping the ring gear (the clutch disk, spring, bearing, etc are identical), but this HPI has a really similar design to the Slash one just uses a 2.5mm cross pin. Drilled out the SuperShafty input shaft to 2.5mm, then actually sacrificed that bit to make the pin. Looks just bitchin' all assembled. Assuming the new drill blanks upgrade the output shaft pin, I still have the input shaft gear being held on by a tiny 1.5mm cross pin.

IMG_6699.JPEGIMG_6700.JPEGIMG_6701.JPEGIMG_6703.JPEG


Awaiting arrival of the 2mm drill blanks so I can replace that pin, put the trans back together, and reinstall. Calculated and ordered 22-26mm pinion assortment. They have the same external shaft diameter as the 32P I just took off so I think the plate will be good in that respect, just need to assemble and see if I have enough room for the mesh I want or if I need to slot it more. I can then take it out and test and see if we solved the transmitter issue, and get back to work on the wheelie bar and figuring out where we want to be for gearing. I think I mentioned I wanted to shoot for 1.75:1, 22 would be 2:1 and 26 would be 1.69:1. I'll keep an eye out and see if they get in any of the 38T rings anytime soon to try, but with the new mount plate maybe I'll have enough room to just make up for it in pinion size.

Too bad this thing isn't fast enough to justify a wing, the shark fin would make a dope mount.
 
Last edited:
Output shaft back together
IMG_6710.JPEG


22T pinion is in and meshes fine. Bottom motor really doesn't have a ton of space to be moving about and some of these welds are going to need to get knocked down.
IMG_6711.JPEGIMG_6712.JPEG


4S installed, cleans stuff up a little bit and gets some zip ties out of there. I am still on the fence about this whole dual motor setup in this chassis, that's why I didn't go through the effort of making another battery hold down. Zip ties have proven themselves more than capable so far in a few rollovers.
IMG_6713.JPEG


Plugging away at tacking up this rear motor mount/motor plate/wheelie bar setup. Not putting too much heat into the m4 nut unions has been a challange. I'm no award winning welder, but they hold together pretty well and I make up for it with the grinder
IMG_6717.JPEGIMG_6718.JPEGIMG_6719.JPEGIMG_6720.JPEGIMG_6721.JPEG
 
I used those long through bolts to position the unions (couplers) as I tacked them in place, but I've really been struggling to get enough penetration to stick them to the plate yet not warp the internal threads. Tried a bunch of different settings and methods - immediately cold water quench afterward, real short beads and move around point to point often, coat the bolt in antiseize, weld with no bolt in it, nothing seems to work. Afterwards, I go to thread the bolt in (by hand) and it goes in with little to no resistance, then won't come out and breaks off in there. It's so weird (but I also don't weld nuts this small either). Had to cut these out a bunch of times. Eventually just settled on full send it, tack it in place where I want it then put a bunch of heat in it, let it cool, come back and just run the m4 tap back through it and the thread chaser. Thank goodness I bought the 20ct bag since I only needed to do 4.IMG_6722.JPEGIMG_6725.JPEG


I have a 2S lipo 800mah in the dumborc x6, and I'd say it's life is marginally better than 4 aa's. Maybe 5-6 sessions for us, which are usually between 15-30 mins time radio switched on. the battery I got was just what was listed online as the stock battery tray. I don't notice any difference in throttle response or range, but those are listed as strong points of this radio to begin with. I took it apart to clearance more room after getting measurements online of available batteries and went up to a 2000mah battery. We like Zeee products, and these came as a two pack so I can have a spare charged in the bag. They come with some fancy small USB charger that charges through the balance plug that I won't be using. A side effect that I didn't think of is I really appreciate that it almost doubled the weight which feels really good in the bottom of the radio and balances it out a lot better.
IMG_6726.JPEGIMG_6776.JPEG


Continuing on the process of finish welding, knocking down a few of the welds that got in the way they were too big, metal finishing
IMG_6763.JPEGIMG_6764.JPEG


Still on the fence about a wing (probably Kraton 8s or something of that nature that offers a ton of downforce, I'm not worried about scrubbing speed), but I needed to clearance a little of the extra material now that we are getting close to finished (to reduce weight, and to fit the body. Ended up notching the body a little. My son loves the "shark fin," so for now, we're keeping the shark fin.
IMG_6765.JPEGIMG_6766.JPEGIMG_6767.JPEG
 

Attachments

  • IMG_6729.JPEG
    IMG_6729.JPEG
    238.6 KB · Views: 1
99% metal finished, hit it with two coats of primer to prevent it from flash rusting
IMG_6768.JPEG


Got the 22s on it. Was really tempted to just throw the 26s on it, but whatever. Max size I can run (due to spacing is 29 (1.52:1). Gear mesh is actually pretty easy to set if you just do one, then take that pinion off for a second and do the other. Wheelie bar went on nicely, I may get some different hardware for it.
IMG_6769.JPEGIMG_6770.JPEG


All ready to rock outside. Still need to mess with springs and the body height in the front, I was able to get it much lower in the rear with the new battery setup. Not that we are going all that fast, but anything anti-parachute helps.IMG_6772.JPEG
IMG_6773.JPEG


Took it for a spin across the street, knocked out a 43. Pretty happy with that considering I didn't set the ESCs to the DX2E I was using as a diagnostic tool. They are definetely not seeing full throttle as the LEDs don't indicate it on the truck, but I wasn't really interested in making a huge pass. No problems with the truck range anymore, so we have it isolated to either the DumboRC X6 or the X6FG receiver. I stole another one I had off my 4WD so I'll test that out and I went through the radio, so hopefully it's just that I damaged the old receiver wiring. But since the DX2E and this couple year old Spektrum receiver work, we know it's not the ESCs, batteries, wiring, etc. No flips or issues, but didn't really get up on the bars either due to not going full power and everything being soaking wet - like rooster tails of water wet grass from a week of rain. Ice skating above 40mph. Trans worked fine, gears sounded good, motors and ESCs ran cold, brought it home with no issues.
IMG_6774.PNG


Time to swap back to the DumboRC radio, test again, and await good weather. I have springs on hand to try and other little projects in the meantime. With this much wiring going on, this is the best I can do. For sure, the two motor setup adds weight and complexity.
IMG_6775.JPEG
 
Last edited:
Installed the X6FG, calibrated the ESC throttle endpoints to the radio again, and while I was at it, adjusted the ESC(s) settings again - maximum drag brake 16%, 50% brake force (per ESC), and changed the rear motor rotation to CCW so I could wire them both the same. Not that anyone cares, this thread also serves as notes for me. I had previously kept the braking to very little for fear of it nose diving and doing an endo with the two ESCs, but it has NOWHERE near enough brake and takes forever for a safety runoff.
IMG_6779.JPEG


Went to adjust the front body posts lower and ran into interference, so cleranced my front strut tower add on a bit.
IMG_6780.JPEGIMG_6781.JPEGIMG_6782.JPEGIMG_6783.JPEG


Super raining outside, so I installed the front springs that finally arrived off the boat from China. Put the stock Kraton springs (the 1.5mm ones) back into the rear shocks, and came up with this for a ride height. Definetely MUCH lower and much improved suspension travel, still trying to find what works. This isn't an on-road speed car where I can just run tiny tires, slam it to the ground, and basically lockout the front suspension, there's this giant compromise of wanting to run huge tires while still getting the rest of the body as low to the ground as possible while keeping a somewhat working suspension range.
IMG_6784.JPEGIMG_6785.JPEG


Hey, at least it looks pretty cool.
IMG_6786.JPEGIMG_6787.JPEGIMG_6788.JPEG
 
Good day, had a few minutes to go out to the park where we have enough room to see if the radio range issue is fixed (and have enough safety runoff room if it's not). It is, and everything seems to be working fine. I could see the definite failure in the one X6FG antenna that was on it, I guess I was just super unlucky and the other one I had sitting in my toolbox somehow went bad. This one I stole from the 4WD one works fine, so I ordered up a spare when I got home.

The wheelie bar worked really well, we didn't have a single flip today. Between it, throttle control, and traction limited by wet the truck was pretty sorted today. Suspension worked okay, it's really hard to get data on a day like today where the terrain is being such a variable, but it worked well enough that it didn't limit what we were trying to do.

39 on grass, 59 on pavement with no changes on a huge uphill. The point of today wasn't for us to go out and run a big speed number, I'll say the biggest factor in those numbers is level of bravery staying in it. Given the available space and conditions, I was only willing to send it so hard. I'm not wadding up the truck on a day where we are out just testing and there is zero chance of running a new best. Grass was tall, and it's been raining hard for a couple days...it looks like we are running through standing water but that's just how much moisture the soil is holding onto.


Attachments

  • IMG_6792.PNG
    IMG_6792.PNG
    77.2 KB · Views: 2
  • IMG_6790.PNG
    IMG_6790.PNG
    77.2 KB · Views: 2
Testing in the wet is just a waste of time, LOL.

The video only shows it at points, but the ground is saturated to the point in some areas that your shoes make the squishing sound as you walk in it, and the rest of it has that soft sink beneath your feet feeling. The Badlands absolutely tear it up. Steering inputs at speed are a joke, let alone trying to apply power. Got two half decent passes in for the day, but most were more like the third one or aborted runs.

The wheelie bar is working really, really well, and the steel motor plate was a good choice. It picked up and kept going long after that pothole hit, it just jarred the rear right camber link loose.

 
ARAC9608 Talion/Typhon 6S rear wing, made a mount
IMG_6905.JPEG


Chopped the shark fin to be on the same plane but slightly higher than the rear decklid, similar to how the Kraton 6S is. I'm thinking about making my first YouTube video with a leafblower and a smoke machine. At very least, the wing is going to catch what's coming around the sides of the cab. I test fitted it a few places farther forward and backward, and settled on this spot for aesthetics and to try and keep it tucked in a little to minimize damage if it rolls.
IMG_6906.JPEGIMG_6907.JPEG


My plan on how I'm going to trim the upright.
IMG_6908.JPEG


Tacked it in place after LOTS of measuring. Did the best I could using reference points from other spots on the chassis. Doing my typical index card template now, I'm going to run it like this just tacked together before making the other upright.
IMG_6909.JPEGIMG_6910.JPEGIMG_6911.JPEGIMG_6912.JPEGIMG_6913.JPEG
 
When researching how to make a homemade wind tunnel/smoke machine device to crudely test aero, I ran across a bunch of claims that (convinced me) argued that RC aero matters as little as 15-20mph, due to scale. Will it make enough difference at 50mph to notice a performance difference? Will I be able to fabricate good enough aero to get the positive effects it could offer? Will me or James be able to drive well enough and consistently enough to notice the difference?

I had free time, and I got to thinking that if the wing does make a decent amount of downforce it's going to bend the crap out of that single mount and 3 tack welds, so I got the other in today. After transferring the template to metal, I was actually smart enough to trace it on my shop's bench so I can go back and make a template to grind the existing upright to match the shape instead of trying to eyeball it side to side.
IMG_6914.JPEGIMG_6930.JPEGIMG_6931.JPEG


Just tacked in for now, should be plenty strong enough even if he rolls it.
IMG_6932.JPEGIMG_6933.JPEG


Notched the body for the second upright. I really, really like the way it came out. I have some new Paw Patrol decals for him for Christmas, I need to get him a new body too so we can redo the paint job. This thing deserves to have a nice body again for pictures. We have two other stock bodies (the grey/blue and the orange/white/black) but I don't think there's a way to remove the factory paint without making the plastic all hazy (anyone want to chime in here?).
IMG_6938.JPEGIMG_6939.JPEGIMG_6940.JPEG

IMG_6935.JPEGIMG_6937.JPEG


new springs for the front (same length, more rate) and 70WT shock oil (stock is 30ish in these) on order. Ground has been frozen last few mornings, should be interesting to see what impact that has. Can't be worse than the marsh it's been the past few weeks, that's for sure.
 
Last edited:
Lately we've been trying to pick and choose our spots with the weather to test, actually having some pretty decent results on the hard ground now that it's cold. Currently battling wheelies again (that's a 50mph power wheelie on the street, it doesn't get better with speed). Took some suggestions from the guys on the off road speed list of how to move forward.


For one of his Christmas gifts, I touched up the body paint and applied new Paw Patrol decals. It's nowhere close to perfect, but we took some photos before we messed it up again. I used some reinforced body tape on some areas we tore that my dad had from slot car racing, seemed to work pretty good. Maybe I'll do flex seal or something on the underside.

IMG_6942.JPEGIMG_6946.JPEGIMG_6953.JPEGIMG_6956.JPEGIMG_6960.JPEGIMG_6967.JPEGIMG_6971.JPEGIMG_6972.JPEGIMG_6979.JPEGIMG_6982.JPEG
 
Flex-sealed the body
IMG_6986.JPEGIMG_6987.JPEG


Back to the Kraton stock rear springs in the rear and 70wt oil
IMG_6983.JPEGIMG_6951.JPEGIMG_6984.JPEGIMG_6985.JPEG


New "China spring" 1.6x24x35 (up from 1.4x24x35) and 70wt in front, set rake as recommended per feedback from the off-road speed race group
IMG_7064.JPEGIMG_6988.JPEG


Went up to 26T pinions to help reduce low end torque and hopefully fight wheelies. I may need to move to sensored motors at some point, it's getting difficult to get it started under its own power.
IMG_7063.JPEG


90 degree turn ESC extensions came in, this allows me to get the rear of the body lower. Also, much shorter than all the excess we had before.
IMG_6947.JPEG
 
We took it out on one of the very cold recent days (14 F) to see how it would do on the ultra hard surface. You'd think there'd be NO traction but it actually wasn't terrible. Suspension seemed to be working well and we kept making quicker and quicker runs into the mid 40s when we had a sudden and complete loss of all movement. Wheels completely locked with no obvious signs of an external failure like an axle or a locked up hub.

IMG_7066.JPEGIMG_7078.JPEG


Found the problem
IMG_7080.JPEGIMG_7081.JPEGIMG_7082.JPEGIMG_7083.JPEGIMG_7084.JPEG


Looks like that 1.5mm pin I was afraid of on the input shaft finally gave out and took out a chunk of the input shaft gear. Metal fragments circulated around and ate the whole gearset. Case and shafts seem okay. That's a Robinson Racing x-hard 1547 gear to give you some idea of the kind of stress the transmission is seeing. I re-ordered the input gear and I contacted SSD about a replacement gearset but it's a holiday so I probably won't hear until the new year.


Some good news is that 2mm pin we broke previously in the diff/output shaft that I replaced with a high speed steel drill blank seems to be holding up perfectly, so while waiting on other things I cut a 1.5mm one for the input shaft. The real fix here is a one piece input shaft, but coming up empty on finding one. All the 20T I can find are either aluminum or use a completely different bearing system. Traxxas is 22T. I previously tried a DR10 one, I might just have to make it work. If I drill this pin oversize to 2mm, I need to make the same change on the input shaft gear, making it weaker in the place that just broke.
IMG_7093.jpegIMG_7094.jpeg
 
While I had everything apart, I swapped on some XO-1 rear camber arms (hoping to resolve this inner joint popping off issue once and for all) and moved the outer attachment point to the rear of the hub, not the front. They're just a thicker Slash arm.

IMG_7095.JPEG


I needed to figure out a solution to the input shaft/pin issue. Pictured top to bottom are Supershafty hardened AX10 style input shaft for Slash RWD slipper setup with new RR hardened input gear and upgraded 1.5mm pin, DR10 hardened input shaft, gear (uses a slot style, not a pin), and Traxxas 9494 input shaft (from the 272R trans) and its gear.
IMG_7102.JPEG


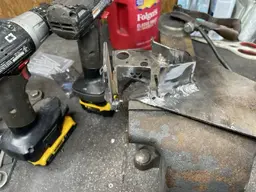
Long story short, what I ended up doing was pressing off the 272R gear (wrong tooth count, won't fit a non-adjustable housing) and machining down both the 272R shaft to accept the DR10 gear and the DR10 gear to fit in the housing, then pressing the DR10 gear onto the Traxxas shaft and using stud-lock just in case. So now the input shaft is essentially one piece. If I manage to break this, the answer is simply too much power for this setup.

IMG_7103.JPEGIMG_7103.JPEGIMG_7104.JPEGIMG_7105.JPEGIMG_7106.JPEG


While all this was going on I had reached out to SSD on 12/22 through their website "Contact Us" form to tell them I needed a replacement gear set for the rest of the trans (I was very clear I expected to pay for it). This is a proprietary gear set and casing from them, it can't be sourced elsewhere (trust me, I turned over all those rocks to look). I figured, close to the holidays, gave it 3 days and emailed them again. Checked spam. Used a different email. Kept trying, once every 3 days. Eventually reached out to AMain (who I purchased it through) to see if they had direct contact info. Reached out on Facebook, asked other groups if they had heard anything, etc. AMain went back and forth with me trying to find the gears elsewhere, swore this was very unlike them, and eventually just broke down and gave me the contact info they have on SSD. I finally got an email back today, 01/27, stating that they "had been off for 2 weeks" and "would get me a price shortly." I'm really trying to stay patient and understanding until this resolves to see if I feel differently, because right now I feel like absolutely blasting them on here and the other places I frequent like the speed run groups. I would even have been okay with an answer like "we're a small company, we don't make these in house, we outscource them, they get shipped to us as a unit and we sell to the customer sorry we can't sell you just gears you have to buy another whole unit" would have been okay with me. But no response...for over a month!?!?!? Not a good way to do business, that's all I'll say right now. Go ask Hot Racing how I can hold a grudge and how much damage can be done. That's why this thread hasn't been updated in so long it actually fell off the first page


I did get around to metal finishing both the uprights, adding material on the one side and removing it on the other to give them matching/swepping shapes.
IMG_7114.JPEGIMG_7115.JPEG
 
Getting the "stock" ax-10 back in. The bolt holes are completely different to the motor plate. The SSD 1.8:1 trans has a much bigger idler gear and a much smaller differential so the case is entirely different. More or less weld up the old ones, drill new ones, metal finish it. All Robinson Racing gears in the trans, and SuperShafty input shaft

IMG_7290.JPEGIMG_7292.JPEGIMG_7294.JPEGIMG_7297.JPEGIMG_7298.JPEGIMG_7323.JPEGIMG_7324.JPEGIMG_7333.JPEGIMG_7334.JPEGIMG_7293.JPEG
 
IMG_7340.JPEGIMG_7339.JPEG


38T mod1 gen 3 slipper for Revo 3.3 - FINALLY found an old stock one. Hopefully this will help me make up some of the gear ratio lost by going away from the 1.8:1 trans and back to the stock ratio 2.6:1. Also clears some more space for larger pinions, I was maxxed at a 26T.

IMG_7366.JPEGIMG_7367.JPEGIMG_7368.JPEGIMG_7369.JPEG


It uses a 2mm cross pin for the clutch plate instead of a 2.5, but the input gear is a 1.5 so I'm not really worried about this being the failure point.

IMG_7483.JPEG


After I assembled everything I found the input shaft to be bent, right at the oversize hole I drilled. The trans exploding and coming to an abrupt stop @ 50mph is a lot of force on a 5mm shaft, hardened or not. Regardless of the cause, drilling an oversize hole in it didn't help so not having to do that again might be a benefit. I would normally have some concern about the loss of surface area with the smaller clutch surface, but running it full tight minus 1/12 turn is basically a clutch lockout at this point anyway.


IMG_7481.JPEGIMG_7450.JPEGIMG_7449.JPEG
 
22/22/44 @ 1.8 = 3.6:1 netted 59mph on pavement. It absolutely had more in it.
26/26/38 @ 2.6 = 3.8:1. Honestly not as bad as a loss as I thought.

IMG_7482.JPEGIMG_7484.JPEGIMG_7485.JPEG


She's back together, I set the rear camber to -1, lowered the rear ride height a little I don't remember the rake being this dramatic maybe some springs are in order. Charged the batteries and weighed it. Now I need a nice day, the grass is wet and the ground is super soft and my wallet is tired of my impatience (and I'm starting to have parts on this that I can't get replacements of or take a long time to get).

IMG_7490.JPEGIMG_7491.JPEGIMG_7493.JPEGIMG_7494.JPEG


5.60 kg on wife's digital scale, 2.112 front 3.646 rear on scales I believe to be accurate (good enough to get a ratio, which is what I care about). 36.6% front. Obviously two massive motors back there offset a lot to the driver side isn't helping. This is with the second battery farther forward than the stock battery location, a ton of weight in the nose, and the second ESC forward mounted.

IMG_7487.JPEGIMG_7488.JPEGIMG_7489.JPEG
 
Another thing I addressed is the lingering 3-9 (think a clock) play of the rear wheels. It can't possibly hold an accurate toe setting with movement like that. I'd imagine it wobbles pretty good at speed, though everything is moving too fast for me to possibly see that. Drilled the RPM arm and the XO-1 rear hubs for a 4mm pin. Tried a SS pin at first I don't want to just use a bolt because the section that goes through the hub shouldn't be threaded. Ended up finding a longer partially threaded bolt and then added some more thread to it and cut it down to length. The rear of the RPM arm is m4 threaded to accept the bolt and then I added a m4 nut on for good measure. Seems to have plenty of clearance and resolved 90% of the slop.

IMG_7341.JPEGIMG_7344.JPEGIMG_7448.JPEGIMG_7422.JPEGIMG_7420.JPEGIMG_7421.JPEG


Did have a chance to get it out and shake it down today, finally. Nothing broke, everything seemed to function well. Turns like a battleship because of the steering settings for speed runs, but goes and stops well. Goes relatively straight even under power. It will STILL power wheelie on command, which really isn't a good thing. Despite having a big piece of property (2 acres), the longest single clear stretch I have measures 232ft. It did 37mph today in that span (including the braking distance) which is 3-4mph faster than I've been able to ever get this one or the 4wd one on my property. Promising. Right now conditions are not good to go out to the big spots and make full hits. Tall grass, wet soft ground.


IMG_0010.PNGIMG_7503.JPEGIMG_7504.JPEG
 
Had a chance to go to our local park today. Not ideal conditions, and certainly not enough room to really open it up, but it was fun nonetheless. Performed without issues, rolled it twice and didn't break anything. At maximum it saw about 80% throttle for a 3 second burst. There just isn't the space, and parts are extremely bumpy. We both had fun.

IMG_7525.JPEGIMG_7526.JPEG

Our day ended when the left rear wheel came off and went rolling past the truck. The Yokama wheel nut and the MIP wheel hex were nowhere to be found. We were fortunate it wasn't worse. This final one was 42 mph but it had three 45's back to back to back. Clutch/spur seems to be getting a little hot so I'll need to monitor that.

 
Last edited:

Latest posts

Members online

Back
Top