r8derhed5150
Well-Known Member
- Messages
- 151
- Location
- Oakland, Ca
Hey all. I've had so much fun figuring out how to accomplish this on the Temper and end up with a full time 4x4x4 rig on a budget and I'm excited to share it with you.
So to keep things simple for now I will grow this how-to with more detail as my time permits so I'm not going to go into how to install the actual servo today because it installs exactly like the front does. My only issue is the hardware as I am not too sure of the screw sizes. I went shopping in dads shop where over the years he had harvested all kinds of micro screws from anything that had them that was on its way to the trash. But I will be updating this thread as I find out more and will post correct screw sizes in the near future. Now lets get to the good stuff.
The best thing I discovered on this truck is it's 4 wheel steering ready. The front and rear axles are identical but the rear is anchored to the axle with a small adjustable turnbuckle link. There are caster mounts and steering knuckles already. You only have to add a few parts and I have provided the required parts list (minus screws=P) down below.
My first attempt lead me to disappointment. I had followed a how-to video on the MaxStone. Some how in this example, with only the use of a servo y-cable along with the rest of the required parts was a simple plug and play mod. This was not so with the Temper. After installing the parts and connecting the rear servo, all four wheels would turn in the same direction. Not what we're looking for! Okay, let me try to reverse the + and - and see what happens. Nothing. Not even the front.
Wow, okay. Guess I have to figure out how to reverse a servo. Realized that the servo drive circuit will always need propper polarity since it has to power an IC to run things. So the next best way to reverse a servo without costing a dime is to crack it open and reverse the potentiometer polarity, as well as the servo motor polarity. Together will accomplish servo direction reversal. Well when I went to do this, I opened up the the servo and discovered the particular servo I used (Spektrum s603 so it matched the stock front) has the motor and control board epoxied in and the motor leads are inaccessible. So you have a few options here.
1. Use a different servo that either:
a. is reversed (not sure if you'll actually be able to tell before buying)
b. has accessible motor and potentiometer leads (soldering skills required)
OR
2. Use a TURNIGY servo manager or TURNIGY servo rerverser cable (just discovered the stand alone reverser so unconfirmed if it works but I can't see why not?)
OR
3. My first setup
 Flip the servo backwards and upside down and hook up the linkage that way. No electronic mods necessary except for the y-connector. I didn't like this because if you use this method, you have to 'float mount' the servo meaning mount using the servo's lower holes to the mounts upper holes. This is necessary in order for the horn to clear the axle pumpkin. Three good reasons why I don't recommend this:
a. If you spin your servo mount 180 degrees, you can only use two standoffs to secure the mount. This allows a ridiculous amount of flex and loss of turn power when needed.
b. The servo housing almost protrudes past the rear tires.
c. Tracking can also be an issue due to the difference in geometry. The steering is so much better after using method #2.
OR
4. The most expensive method, but the biggest pay off. A three+ channel rx/tx and a second servo. This method will give you the holy grail of traversing performance where depending on the options your radio has, you can switch between full time or even independent front OR rear. This could be the best method IF... you either have this equipment laying around already, or don't mind an electronics upgrade that will probably doubly surpass the cost of the car. If this pertains to you then go for it! Me, I'm just getting back to the hobby so I don't have spare parts yet.
So, I chose method #2. This servo manager allows either servo rate adjustment for two servos and a third tap allows reversal. This option does not require soldering where option #1 does. I wanted to save a few bucks and do #1 but I would have had to buy yet another servo to try this method so its no longer cost effective for me. There are YouTube videos available on how to do this since it is common for airplanes to use this mod already.
Parts list:
Servo - Could not find the S603 for sale except salvaged on eBay for about $20 shipped. I went with this particular servo because I was ignorant to the fact on how servos use the signal from the RX and thought they had to be the same to avoid any unwanted interference or incompatibility. But I'm pretty confident you can use almost any 1/10 surface servo out there for the mod in either scenarios I mentioned but may need to pay attention to the torque this car was engineered for. I may try a random servo just to verify unless someone beats me to it. ECX lists this as an "optional" replacement servo, the S605. It appears that either the S603 was phased out or may even be a production only servo and not an available replacement part or a combination of both. I haven't been able to find any data on on the 603. I think the only major difference between the two is the S605 is metal geared and the S603 are plastic/nylon (not sure but after opening, they are definitely not metal)
http://www.ecxrc.com/Products/Default.aspx?ProdID=SPMS605

-----------------------------------------------
Steering Links - Comes in a pack of 2 but you only need the one.
http://www.ecxrc.com/Products/Default.aspx?ProdID=ECX214006

-----------------------------------------------
Servo mount - http://www.ecxrc.com/Products/Default.aspx?ProdID=ECX211009

-----------------------------------------------
Turnigy servo manager- http://www.amazon.com/Turnigy-Channel-Direction-Regulator-Receiver/dp/B00P4VIG74

OR
(Just discovered as I write this)
Turnigy servo signal reverser http://www.amazon.com/Turnigy-Signal-Reverser-3v~12-6v-reverse/dp/B00QISJQBC

----------------------------------------------
A Male to Male servo cable- Need to connect servo manager to RX. Looks like this is not needed if using the servo reverser.

---------------------------------------------------
A second servo horn. The spline drive will vary depending on our servo so you will have to match one yourself unless you opted for the Spektrum S603, is a 23t spline. But the most important dimension is horn length. I measured about a 17mm radius horn the links all clear each other just fine.
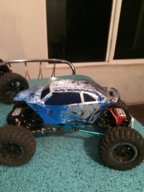
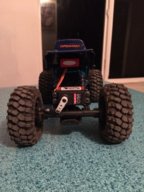
And that's pretty much it. You end up with this:


Hope this helps out anyone interested in squeezing more fun out of their ECX Temper. The upgrade can be done for about $50 or less depending if you shop around or even better if you can recycle some old parts. If you have any questions or need some help accomplishing this, don't hesitate to hit me up!
Mike~
So to keep things simple for now I will grow this how-to with more detail as my time permits so I'm not going to go into how to install the actual servo today because it installs exactly like the front does. My only issue is the hardware as I am not too sure of the screw sizes. I went shopping in dads shop where over the years he had harvested all kinds of micro screws from anything that had them that was on its way to the trash. But I will be updating this thread as I find out more and will post correct screw sizes in the near future. Now lets get to the good stuff.
The best thing I discovered on this truck is it's 4 wheel steering ready. The front and rear axles are identical but the rear is anchored to the axle with a small adjustable turnbuckle link. There are caster mounts and steering knuckles already. You only have to add a few parts and I have provided the required parts list (minus screws=P) down below.
My first attempt lead me to disappointment. I had followed a how-to video on the MaxStone. Some how in this example, with only the use of a servo y-cable along with the rest of the required parts was a simple plug and play mod. This was not so with the Temper. After installing the parts and connecting the rear servo, all four wheels would turn in the same direction. Not what we're looking for! Okay, let me try to reverse the + and - and see what happens. Nothing. Not even the front.
Wow, okay. Guess I have to figure out how to reverse a servo. Realized that the servo drive circuit will always need propper polarity since it has to power an IC to run things. So the next best way to reverse a servo without costing a dime is to crack it open and reverse the potentiometer polarity, as well as the servo motor polarity. Together will accomplish servo direction reversal. Well when I went to do this, I opened up the the servo and discovered the particular servo I used (Spektrum s603 so it matched the stock front) has the motor and control board epoxied in and the motor leads are inaccessible. So you have a few options here.
1. Use a different servo that either:
a. is reversed (not sure if you'll actually be able to tell before buying)
b. has accessible motor and potentiometer leads (soldering skills required)
OR
2. Use a TURNIGY servo manager or TURNIGY servo rerverser cable (just discovered the stand alone reverser so unconfirmed if it works but I can't see why not?)
OR
3. My first setup
Flip the servo backwards and upside down and hook up the linkage that way. No electronic mods necessary except for the y-connector. I didn't like this because if you use this method, you have to 'float mount' the servo meaning mount using the servo's lower holes to the mounts upper holes. This is necessary in order for the horn to clear the axle pumpkin. Three good reasons why I don't recommend this:a. If you spin your servo mount 180 degrees, you can only use two standoffs to secure the mount. This allows a ridiculous amount of flex and loss of turn power when needed.
b. The servo housing almost protrudes past the rear tires.
c. Tracking can also be an issue due to the difference in geometry. The steering is so much better after using method #2.
OR
4. The most expensive method, but the biggest pay off. A three+ channel rx/tx and a second servo. This method will give you the holy grail of traversing performance where depending on the options your radio has, you can switch between full time or even independent front OR rear. This could be the best method IF... you either have this equipment laying around already, or don't mind an electronics upgrade that will probably doubly surpass the cost of the car. If this pertains to you then go for it! Me, I'm just getting back to the hobby so I don't have spare parts yet.
So, I chose method #2. This servo manager allows either servo rate adjustment for two servos and a third tap allows reversal. This option does not require soldering where option #1 does. I wanted to save a few bucks and do #1 but I would have had to buy yet another servo to try this method so its no longer cost effective for me. There are YouTube videos available on how to do this since it is common for airplanes to use this mod already.
Parts list:
Servo - Could not find the S603 for sale except salvaged on eBay for about $20 shipped. I went with this particular servo because I was ignorant to the fact on how servos use the signal from the RX and thought they had to be the same to avoid any unwanted interference or incompatibility. But I'm pretty confident you can use almost any 1/10 surface servo out there for the mod in either scenarios I mentioned but may need to pay attention to the torque this car was engineered for. I may try a random servo just to verify unless someone beats me to it. ECX lists this as an "optional" replacement servo, the S605. It appears that either the S603 was phased out or may even be a production only servo and not an available replacement part or a combination of both. I haven't been able to find any data on on the 603. I think the only major difference between the two is the S605 is metal geared and the S603 are plastic/nylon (not sure but after opening, they are definitely not metal)
http://www.ecxrc.com/Products/Default.aspx?ProdID=SPMS605
-----------------------------------------------
Steering Links - Comes in a pack of 2 but you only need the one.
http://www.ecxrc.com/Products/Default.aspx?ProdID=ECX214006
-----------------------------------------------
Servo mount - http://www.ecxrc.com/Products/Default.aspx?ProdID=ECX211009
-----------------------------------------------
Turnigy servo manager- http://www.amazon.com/Turnigy-Channel-Direction-Regulator-Receiver/dp/B00P4VIG74
OR
(Just discovered as I write this)
Turnigy servo signal reverser http://www.amazon.com/Turnigy-Signal-Reverser-3v~12-6v-reverse/dp/B00QISJQBC
----------------------------------------------
A Male to Male servo cable- Need to connect servo manager to RX. Looks like this is not needed if using the servo reverser.
---------------------------------------------------
A second servo horn. The spline drive will vary depending on our servo so you will have to match one yourself unless you opted for the Spektrum S603, is a 23t spline. But the most important dimension is horn length. I measured about a 17mm radius horn the links all clear each other just fine.
And that's pretty much it. You end up with this:
Hope this helps out anyone interested in squeezing more fun out of their ECX Temper. The upgrade can be done for about $50 or less depending if you shop around or even better if you can recycle some old parts. If you have any questions or need some help accomplishing this, don't hesitate to hit me up!
Mike~
Last edited: