RPM Servo-Saver Eliminator Install/ Review on Amp MT

X

Conspiracy of One
Staff member
Premium Member
Messages
1,218
Many have posted about the RPM Servo-Saver Eliminator. I figured I'd do a more in depth look at the kit and install. RPM part# 73492 is the kit used for this install. It is done on an Amp MT, but the kit also fits the Boost, Ruckus, Circuit and Torment.

RPM Servo-Saver Eliminator Bellcrank

How to install the RPM Servo-Saver Eliminator Bellcrank in ECX AMP


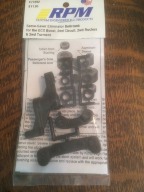
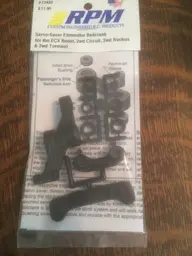
The packaging:

IMG_0426.jpg

I got this kit to alleviate vague steering as well as a large wobble when going in reverse.

th_start.jpg

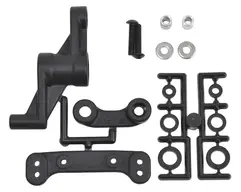
Here is the complete kit:

upload_2016-5-13_15-16-54.png

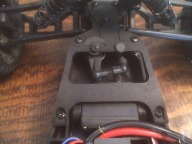
To uninstall the ECX unit start by removing 6 screws. The below photo shows them, they hold the cover plate down.
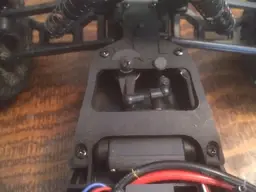
IMG_0427.jpg

Next pop off the ball links on the servo arm and the two on the steering links.

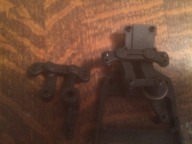
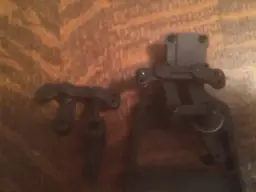
Here is what the underside of that plate looks like. As well as the assembled RPM unit on the left. Two screws removed with the with the link between the two pivot points and the ECX unit comes out.
IMG_0429.jpg

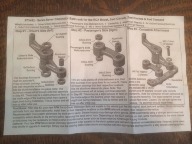
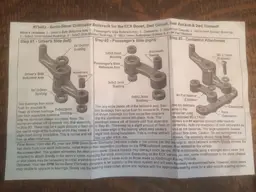
Next is the assembly of the RPM unit. Their directions are below.
IMG_0428.jpg

Transfer over the ball studs, there are 3. A 7/32 socket is used for this.

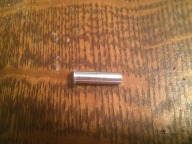
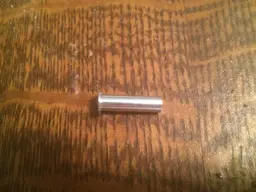
You also need to transfer over this bushing:
IMG_0430.jpg

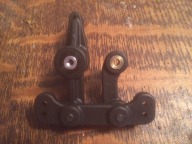
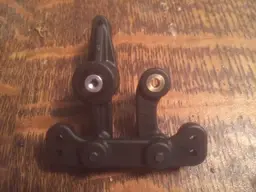
One of my gripes about this kit is the plastic bushings. Lucky for us, the ECX unit has two metal bushings that are the exact same size as the RPM plastic bushings. So I promptly swapped those over. The two metal bushings are in the arm on the right.
IMG_0431.jpg

Now the RPM unit is mounted to the steering cover plate using the 2 screws and link you removed earlier. Don't forget the washers under each pivot point between the plate and servo saver eliminator.

Reinstall the plate in the chassis and hook up the 3 ball links.

Thoughts about the RPM Steering Bellcrank


1. I don't care for the use of plastic bushings that we have to first deburr thanks to the parts tree removal. I will be going to bearings next but wanted to do a apples to apples comparison on this mod alone. The same goes for why I did not do a servo upgrade yet.

2. The RPM kit is quite smooth, but I believe the ECX setup was a little better. If tightened completely the RPM kit binds some. So some care is needed during install.

3. Performance wise, the steering is a bit sharper and I don't notice as much wobble. But.....

th_end.jpg

It's still there......
 
Installing cartridge bearings certainly won't hurt, but after installing the RPM steering assembly in my Boost with bearings, I honestly don't think they are worth it. The steering isn't any smoother with bearings over the plastic bushings or even the car's OEM bronze bushings. I suppose if you can get bearings really cheap, then do it. I bought the required six bearings from Avid and they were US$1.00 each plus about $4.00 shipping. So $10-$11 for bearings on top of the $12 cost of the RPM kit. $22+ for a steering assembly? Holy vanishing ROI Batman! :)

I totally agree with you on the binding issue. I was surprised that RPM didn't address this in the design. An internal sleeve and a couple of small washers might have helped.

Still, the RPM kit is well done and is a solid upgrade by itself. Highly recommended. Cartridge bearings... not so much.
 
Strange, when I zip tied the servo saver, my reverse wobble was completely gone. I assumed the rpm kit would be the same. I guess there is still too much slop in the rest of the linkage.
 
Strange, when I zip tied the servo saver, my reverse wobble was completely gone. I assumed the rpm kit would be the same. I guess there is still too much slop in the rest of the linkage.


Have you done any other mods to your Amp?
 
I painted the tire lettering. I doubt that helped :p

I did notice my servo horns are very tight. I couldn't pop them off, unlike the turnbuckles which took some abuse already. Maybe yours have seen more wall rides?
 
I painted the tire lettering. I doubt that helped :p

I did notice my servo horns are very tight. I couldn't pop them off, unlike the turnbuckles which took some abuse already. Maybe yours have seen more wall rides?


Sadly no....haha. This was bought for my 4 year old a couple weeks ago. I just today got him to take it over jumps.:D
 
Small update on this. Only taken the truck out twice since this review, and I've had to redo the steering trim a couple times (son drives this thing like he stole). Pretty sure the lack of servo saver + plastic geared servo = hopped or broken teeth in the servo. Likely time for an upgrade. :D
 
ive noticed since doing this that the servo gets misaligned (has happened twice), sorry for not being fluent in all the technical parts yet (im reading up every night) but the "arm" (is it called a servo horn?) moved to the far right. It was simple enough to take apart remove the horn centre the servo (power on and off) and reattach everything.
Perhaps when i first installed the RPM SS eliminator i didn't tighten the screw holding on the horn tight enough?
Maybe as im still using stock servo (my TSX40 is on way) ive fracked the plastic teeth? It seems to be fine again now.
 
Since the both the servo's output shaft and the servo horn or arm (I prefer "arm") are plastic, you will see some slippage under a relatively high load. The stock servo arms are relatively soft and they must stretch a little. Since switching to a metal-geared servo I've not had any slippage... but one arm DID break after my car ran into a track side wall.
 
Well along with the TSX40 i picked up some RPM ball ends, and a bunch of other shite ( i dunno i went a bit nuts... i mustve been tired... oh yeah i got duratrax sixpacks coming.. now i remember) i grab a metal or aluminium arm (may have been associated i dunno).
I figured with all the RPM parts, a MG servo yadda yadda it should be tuff enough even with a bit of bashing. Just have to stay away from walls or table legs.
 
Many have posted about the RPM Servo-Saver Eliminator. I figured I'd do a more in depth look at the kit and install. RPM part# 73492 is the kit used for this install. It is done on an Amp MT, but the kit also fits the Boost, Ruckus, Circuit and Torment.

RPM Servo-Saver Eliminator Bellcrank

How to install the RPM Servo-Saver Eliminator Bellcrank in ECX AMP


The packaging:
IMG_0426.jpg

I got this kit to alleviate vague steering as well as a large wobble when going in reverse.

th_start.jpg

Here is the complete kit:

View attachment 640

To uninstall the ECX unit start by removing 6 screws. The below photo shows them, they hold the cover plate down.

IMG_0427.jpg

Next pop off the ball links on the servo arm and the two on the steering links.

Here is what the underside of that plate looks like. As well as the assembled RPM unit on the left. Two screws removed with the with the link between the two pivot points and the ECX unit comes out.

IMG_0429.jpg

Next is the assembly of the RPM unit. Their directions are below.

IMG_0428.jpg

Transfer over the ball studs, there are 3. A 7/32 socket is used for this.

You also need to transfer over this bushing:

IMG_0430.jpg

One of my gripes about this kit is the plastic bushings. Lucky for us, the ECX unit has two metal bushings that are the exact same size as the RPM plastic bushings. So I promptly swapped those over. The two metal bushings are in the arm on the right.

IMG_0431.jpg

Now the RPM unit is mounted to the steering cover plate using the 2 screws and link you removed earlier. Don't forget the washers under each pivot point between the plate and servo saver eliminator.

Reinstall the plate in the chassis and hook up the 3 ball links.

Thoughts about the RPM Steering Bellcrank


1. I don't care for the use of plastic bushings that we have to first deburr thanks to the parts tree removal. I will be going to bearings next but wanted to do a apples to apples comparison on this mod alone. The same goes for why I did not do a servo upgrade yet.

2. The RPM kit is quite smooth, but I believe the ECX setup was a little better. If tightened completely the RPM kit binds some. So some care is needed during install.

3. Performance wise, the steering is a bit sharper and I don't notice as much wobble. But.....

th_end.jpg

It's still there......
What u think about aluminum ones i have one isntalled but it pulls sharp to the left but is weak when turning to the right. And ideas why that could be. May have to find a rpm for my rc
 
What u think about aluminum ones i have one isntalled but it pulls sharp to the left but is weak when turning to the right. And ideas why that could be. May have to find a rpm for my rc

Check this thread: https://ecxforum.com/threads/steering-linkage-design-issue.396/

I haven't solved it yet, but I think the discrepancy in steering performance left to right is a different issue. A metal servo horn could maybe fix it, but then what is going to break when you hit a wall wheel-first?
 
Check this thread: https://ecxforum.com/threads/steering-linkage-design-issue.396/

I haven't solved it yet, but I think the discrepancy in steering performance left to right is a different issue. A metal servo horn could maybe fix it, but then what is going to break when you hit a wall . I

I got my steering to work on my car the screws on the body that hold the tires in place aka the caster blocks were too tight had to adjust all of them !
 
Another small update. I ended up pulling the RPM unit back out and reinstalling the stock setup. My son couldn't make it through a run without the servo horn hopping alot of teeth. I've decided the RPM unit is not worth the trouble unless you do other upgrades like a metal geared servo, metal servo horn or a servo saver servo horn.
 
that's probably the right idea until he gets those other parts. Dont think of it as a downgrade.. just a temporary fix and maintenance saver? :/
 
So i had a steering servo go out on me and got a new servo same torque and such.. but it wouldn't turn bellcrank or wheels at all . Come to find out it was just an adjustment of screws that were too tight that hold the caster blocks and the tire hubs as well i had to re program the trasmitter since some how my steering was backwards .my servo and servo saver and the aluminum bellcrank were after all just fine.. good luck
 
that's probably the right idea until he gets those other parts. Dont think of it as a downgrade.. just a temporary fix and maintenance saver? :/

Honestly, at this point I don't know that I see the point in the RPM servo saver remover. Any gains I saw in steering were minor and immediately overtaken by the fact that it made the servo constantly hop teeth. This is my son's truck, so it's best to keep it running 100% of the time if I can. Maybe in the future if We get bored I'll look into making this work.
 
Honestly, at this point I don't know that I see the point in the RPM servo saver remover. Any gains I saw in steering were minor and immediately overtaken by the fact that it made the servo constantly hop teeth. This is my son's truck, so it's best to keep it running 100% of the time if I can.

I think you've identified the issue, and ECX/HH's design intent right there. The stock ECX steering assembly, while sloppy, can take a beating and works "well enough" for most users.

For me, with my Boost buggy and my intent to race, the RPM and (faster, stronger) MG servo were must-have upgrades. The RPM steering assembly was a "performance upgrade" not a "durability upgrade." Virtually no racers (at my track) use servo savers of any kind and instead rely on other components -- such as servo arms, ball-and-socket suspension links, etc -- to absorb any potentially damaging impact energy.
 

Latest posts

Members online

Back
Top